Hi, everyone! Sheila here...I am so excited to be sharing my first post as part of the IFS team! What a great group of ladies :)
Today, I wanted to talk about a trend I have been seeing everywhere…I’ve seen it called scattering, I’ve seen it called confetti, but I call it “sprinkling”, because it reminds me of the sprinkles on an ice cream. I wanted to show you quickly the steps I take in sprinkling various items across one of my layouts.
The first thing I do is choose my background paper. I usually choose a light colored paper with a subtle pattern, like this one from Crate Paper's On Trend Collection. That is just my personal preference; sprinkling will work well on most colors.
Then, I decide which direction I want my sprinkling to go in, and in this layout, I decided to go across my layout (left to right). My next step is misting and stamping. Even though these techniques are not three dimensional, they definitely add to the feel of the sprinkling! Give your paper a quick mist.
I use the pump part of the mist to add some “drips” as well.
Roll it across your paper.
Then decide appromixately where you want your picture to go. This is so you can roughly determine the area where your three dimensional sprinkles and embellishments are going to be placed.
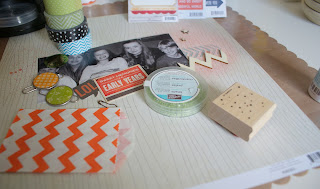
The next part is the most fun. Treat your scrap space like a store and go “shopping”. Gather all sorts of stuff that you think you could use as embellishments or for SPRINKLES…my stash below includes stamps, seed beads, small stickers, tiny wooden stars, washi…
I used the stamp to put some green dots on top of the misting and roller stamp.
Then I began to layer some papers around my photo, and I even found some more things to sprinkle---some large sequins, a heart punch, a little die cut…
I knew I was going to use this scalloped circle, below, so I saved the little tiny red dots from it to use later on.
Oh! And a few more minutes looking around led me to these iridescent sequins! Gotta use them…
I didn't use up everything I collected, but that's ok. This technique of getting stuff out is also helpful to me because it forces me to remember what I have!
My final layout looked like this:
Here is a close-up of my “sprinkled” areas.
I used plain old tombo glue to attach sequins (large and small), punches, seed beads, tiny stars, tiny red paper dots. As a final touch, I put some drops of liquid pearls in random areas (you can see a drop to the right of the star in the top photo). I hope you’ve enjoyed seeing the process I go through to achieve this trendy new look. Remember, anything goes: large, small, teeny-tiny.
Don’t forget that you can use the following to SPRINKLE:
hole punches
decorative punches
sequins
beads
liquid pearls
stickles
stickers
bling
pearls
flair
tiny flowers
Have fun !
~Sheila~


Sheila! Your layout is fabulous! And I love how you taught us about sprinkling! I actually have never heard of this technique, but I am so inspired that I am going to start a layout today using it. Thanks for sharing!!!!!
ReplyDeleteSheila, your layout is lovely! Thank you for sharing your tutorial. It reminded me that I have many of those things in my stash and don't use them. Time to break them out!
ReplyDeleteThis is fantastic! I love the way you broke down the various styles of sprinkling. I'm totally inspired.
ReplyDeleteI absolutely LOVE the line "treat your scrap space like a store and go shopping" - that is awesome!!! :) I actually do that myself ... I have a big tray that I gather things in from my shelves, and take it to my work area. Great post!!
ReplyDelete