Hey everyone, Cathy here today to share a wonderful thing that you can do with your Silhouette machine. This works on both the Cameo and the Portrait. It's not just for cutting! You can draw with it too!
I've only started to use the sketch feature on my Cameo and I have instantly fallen in love! I've been using it to write sentiments on cards, but titles and journaling on scrapbook pages, and to create designs for cards too, You can do so much more with it, I've only scratched the surface.
To use the sketch feature on the machine, you'll need to have either some Silhouette sketch pens or have an adapter to hold your pen or marker.
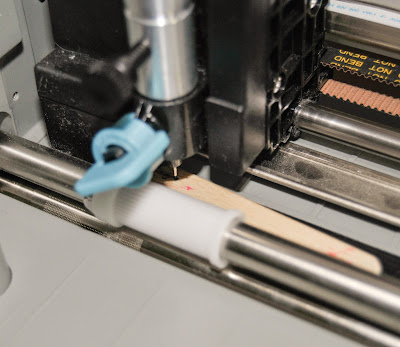
I bought the Amy Chomas Adjustable Marker Holder to use with my Cameo. It's quite easy to use. You remove your blade from the Silhouette machine, and replace it with the holder. You place a Popsicle stick (provided when you purchase the holder) underneath, insert your pen in the holder with tip touching the Popsicle stick and tighten.
I've tried a few different pens and markers in it. One of my favorites is the Staedtler Triplus Fineliner. These pens are photo safe, dry-safe (they can be left uncapped for days without drying up) and best of all, they are fine point! I'm kind of a freak for fine point writing implements! Plus you can get them in various colors. I found my 10 pack at Staples.
So now that we've got the tools, let's use them to create a card. Open up the Silhouette Software and create a card base. I'm using a shape from the Silhouette online store called "cut out flower card". Choose the text tool, your font and size and type your sentiment. Position it where you want it to print on your card. I used a font called Lavenderia. For a great list of thin fonts that work well with the sketch feature, check out this post by Gigi at One Day at a Time.
After you have your text where you want it, open the cut style window (little scissors). Select all but the text and click "no cut". This way the only thing that is set to be "cut" is the text. Don't worry, we're not going to "cut" it. But the machine doesn't know that!
Now set up your Silhouette Sketch Pen or holder and pen in place of the blade.
Here is a close up of the pen tip resting on the Popsicle stick:
Put your cardstock on a cutting mat and load it in the machine. Open the cut settings window and select Silhouette Sketch pen. Then send it to the cutter by pressing "cut".
Watch as your machine sketches out your sentiment (above)!!
Don't unload your met. In the Silhouette software, open the cut style window again (little scissors). This time set the text to "no cut" and all other items to "cut". Go to the cut setting window and this time set it to the appropriate paper weight (in my case "cardstock"). Remove the sketch pen or holder and pen from the machine and replace with the blade. Now send the design to the cutter to cut out the card base.
Finish up cutting all of your pieces and assemble your card.
Now when you don't have just the right sentiment stamp. you can sketch the sentiment instead!
Spend sometime visiting Amy Chomas' blog. She shares lots of inspiration and ideas for creating projects using the sketch feature on the Silhouette machines. She also has tutorials and videos to help you be even more creative.
Did you happen to notice the engraving tip in her shop? I love working with metal, so this is definitely going on my wishlist!
VISIT THE CONTRIBUTOR'S BLOGS/GALLERIES
Cathy Dippolito
Dolores Schaeffer
Cindy deRosier
Marlene Murphy
Lesley Walker
Gael Spence
Sarah Routledge
Sharon Fritchman
Tanya Ham
Sheila Burns
Pam Callaghan


I need to get this for my machine! I love this!
ReplyDeleteThat is really cool. I saw something like this demonstrated at Scrapbook Expo, but they didn't show the possibility of sentiments. That makes it totally worth it to me.
ReplyDeleteWOW Cathy!!! I am in awe of the versatility of the Silhouette! You used it in so many cool ways! thank you so much for sharing this post with us!
ReplyDelete