
Thursday, March 21, 2013
Spring Break!!!
Hi all. Ifs is taking a brief break for spring. We will be back on April 1, with some fun news, see you then.
Wednesday, March 20, 2013
Designer Showcase: Spring!
Yeah!! It's the first day of Spring!!! If you're like me, you look forward to Spring. It means warmer weather. It means flowers, and bright colors. It means sunny days. It's Cathy here, with this week's Designer Showcase, we are celebrating by sharing some Spring projects with you!

Gael is sharing this older layout that she created. It is just filled with blossoms! There are gorgeous swirls and flourishes to make the "vines". The butterflies are so sweet. Gael did something really neat on this page. She took a Rhonna Farrer circle brush and printed it out on a transparency. She laid it over her photograph. It really gives the effect that the bee has been magnified!

Marlene has shared this fun page. Yes, it has snow on it, but it is still a Spring page. Some of us are in climates where snow continues through most, if not all, of Spring. As Marlene put it, this is the "upper Michigan version of Spring"!! The photos are so fun and Marlene stretched the fun onto her layout. I love the title "Got Spring?" The whimsical papers and fun brightly colored clips keep us dreaming of those warm Spring breezes!


Here are a few Spring time cards that I created. Easter is always a sure sign that Spring has arrived. This year Easter is a bit early. There won't be quite as many beautiful blooms about for the holiday. Speaking of blooms, who can work in the Spring garden without a pair of wellies? I thought the rain boot would make a sweet card to send some seasonal greetings.
We hope that you are enjoying the change of seasons in your part of the world! Happy crafting!

Wednesday, March 13, 2013
Designer Showcase: Lace
Welcome to another Designer Showcase Wednesday! Today we have the theme of lace. This always brings out the really pretty side of projects. The ones that you can really drool over. So let's get to them!

Marlene is the creator behind this gorgeous masterpiece. She used some lace that she loosely pleated across the top of her photo. Looks very much like the parasol in the photos, doesn't it? She also placed a little lace peaking out from under the matting. Marlene also used some border punches to create lacy edges using patterned papers. One of the papers is actually a lace print. A very creative way to add the look of lace to your page, even if you don't have actual lace.

The corner cluster on this page that Sarah created is adorned with lace. She used it as a base accent on her matting to highlight the flowers. Sarah also used some crocheted lace to tie a pretty bow in the corner of her cluster. It is such a beautiful addition to the page. It reflects the details of the brides dress and adds some vintage charm to the design.

I love this idea on Cindy's page. She created a wide border behind her photo using lace. You could do this using a wide lace, or use 2 pieces of a narrower lace covered by a strip of paper. The lace adds just a touch of elegance to Cindy's lovely page.

Cindy and I had a laugh that neither of us gets to work with lace very often Living with guys, lace is not a "go to" embellishment for most of our scrap pages. But I do like to use lace on projects and gifts that I create. This is a paper gift box that I made. I thought the lace was a nice touch to add texture to the box.
Monday, March 11, 2013
Tile Coasters
Looking for a quick, easy, but personalized project that you can do as a gift? Or maybe to help spruce up your own home? Try making some tile coasters using your digital or traditional paper crafting supplies.
Hey there! It's Cathy here, I'm going to share a tutorial for making tile coasters. Now, I made these back in the Fall to give as a Christmas gift. So I'm using some holiday motifs on mine. You can use anything that you like. You could make a set for everyday use or a set for various holidays, or maybe themed for using when celebrating a birthday.


Hey there! It's Cathy here, I'm going to share a tutorial for making tile coasters. Now, I made these back in the Fall to give as a Christmas gift. So I'm using some holiday motifs on mine. You can use anything that you like. You could make a set for everyday use or a set for various holidays, or maybe themed for using when celebrating a birthday.
You can pick up the tiles at any home improvement store. You might even have some lying around from a leftover home project. Stock up on a few and you can make several sets at once. The only hard part will be picking out which ones to give and which ones to keep!

Supplies you will need:
Decoupage adhesive
Decoupage sealer (optional)
Scissors
Scrapbook paper (digital or traditional)
4"x4" Square Ceramic or Stone Tiles
Bristle paint brush
Felt
** If using digital scrapbook kit you'll also need:
** If using digital scrapbook kit you'll also need:
Photo editing software
Inkjet paper
Printer
I used Beacon Adhesive Fast Finish Decoupage and Decoupage Glass Sealer for this. You could also use Mod Podge or your favorite brand of decoupage medium.
1. Clean square tiles using a damp cloth. Allow to dry completely.
2. Select elements or paper to use. If using digital scrapbook kit, resize them to fit on tile, if necessary, in photo editing software. Print.
3. Cut out the elements, or trim the paper to fit on the tile. Cut the papers slightly smaller than the tile.

4. Using slightly damp bristle brush, apply a coat of decoupage medium to tile.


5. While decoupage medium is still wet, adhere cut out element/paper to tile. Smooth over surface to remove any bubbles.
6. Apply thin coat of decoupage medium over top of element/paper on tile using bristle brush. Allow to dry.


7. Apply additional 2-3 coats of decoupage medium to tile and allow to dry thoroughly between coats.
8. Protect the work surface with a craft mat or waxed paper. Spray decoupaged tile with gloss sealer to seal. Hold bottle about 6 inches from tile and spray top coat. Allow to dry. (Optional)
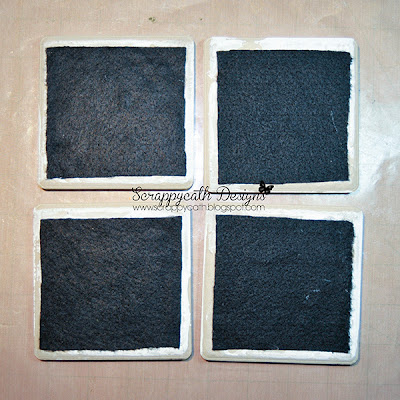
9. Cut felt to fit the bottom of the tile. And adhere.
10. Wrap them up in a pretty bow for gift giving.

10. Wrap them up in a pretty bow for gift giving.


Here are the supplies that I used:
Digital Kit: "Penguin Pals Digital Kit Bundle" by Paper Garden Projects
Paper: Epson Premium Presentation Matte
Adhesive: Beacon Adhesives 3-in-1 Advanced Craft Glue, Decoupage Gloss Sealer, Fast Finish Decoupage Glue
The tiles were left over from a home improvement project that we did. If you have some, this is a great way to "upcycle" them.
Saturday, March 9, 2013
Bath Bubbles


Cute stuff isn't it? Here's how I created the sparkly bubbles for my card. I opened the elements that I wanted to use (tub, bubbles, duck, towel) in my Silhouette software. I resized them to fit my card. Then I print and cut them. You can also cut them by hand.

On the bubbles, I applied a bit of Glossy Accents mixed with some fine blue glitter. The Glossy Accents gave it a wet look, while the glitter added that bubble shine. Once it was all dried, I layered the pieces on my card front.
Birthdays are a good time to remind friends to unwind and enjoy life. So I thought this made a splashy cute birthday card.
Thursday, March 7, 2013
Reader's Page
Good Thursday everyone!
It's Pam again, sharing a reader's page with you all! It was sent by Libeeti, who has shared reader's pages and guest posts in the past. I was so happy to get another page from her the other day. She sent it in response to my post on Scrapbook trends over the years (I used sunburst pages), which you can see here. She used this technique on three of her own different projects. Check out the sunburst effect on each project. I especially like the colors combinations she chose as well and the stitching between each ray. Notice how she connects the rays at the bottom with buttons or a star.. so cool! The layout is just gorgeous and wouldn't you love to receive those cards??!! Please take follow this link to see more of Libeeti's work. I love to browse her blog!!


Thanks Libeeti for sharing your projects with all of us
Monday, March 4, 2013
Embossing the backing paper off the Prima Tree
Hi, it’s Gael here again and this week I would like
to show you how I used the backing paper off the Prima felt tree on
this layout.

I
had recently used the Prima felt tree on a layout and thought the
backing paper would make a great mask so I kept the white backing paper
with that thought in mind.
Like
a lot of my ideas, I don’t always go with my first thought. When I was
creating this layout I decided I wanted to add a tree and instead of
using the backing paper as a mask I tried embossing the white backing
paper. I covered the backing paper with the embossing ink and then
sprinkled brown and green embossing powder onto it. When I had enough
powder to cover it I then heated it with the heat gun. Lastly I covered
it with Modge Podge to seal it. When I stuck the tree onto the layout I
added some stippling with green paint to blend it all into the
background a bit more.

Friday, March 1, 2013
Using Scrapbook Trends Over the Years (Sunburst)
Hi all! It's Pam here sharing a post about how I used a technique over the years and how it changed and evolved. I am going to call it the "sunburst" technique. It is super popular right now companies using the technique and such. I love the final results of this... I adore it maybe because it reminds me of sunny days!! We all probably need more those huh?
I am going to start way back in 2006. I it is still odd I have been scrapping for so long. It seems like I just started a few years ago. Well this page from 2006 utilizes the sunburst technique. I cut out negative space for the sun and used very, very old DCWV paper and those fabulous old transparent stars from Heidi Swapp! Remember those??? Here I also accented my page with DCWV chipboard pieces and those fun rub-on sticches. I wish wish I still had those!! Notice how the photo cut to include a place for the "sun."

Our next stop in my scrapping history is 2008. This page is actually a scraplift of one of my page from two years earlier, but I like this version better. This is more like a star burst, but utilizes the same technique. On this page you can see that I extended the stars out to the very edges of this page. I *think* Cloud 9 made this paper and stickers. This is one of my most favorite collections of all time with the lime greens, khakis, and blues. :) That was also when I used to hoard Heidi Swap chipboard pieces! LOL.

My next page on the tour is from 2009. This is more like a true sunburst page is monochromatic. I don't know if you can see it but the photos are sitting on a cut out cloud. The papers, stickers, and dots are from Pebbles, aren't they fun?? For this page and the remainder of the pages, I used my ruler to measure and create my design. BTW you can download the free digital layered template for free here: http://www.4shared.com/file/209056384/4ff2eda1/pc_sunshine_template.html for all of the digi scrappers who want to make this design!

In 2010, I created this page about visiting the butterfly garden. Again I used mostly products from Pebbles. I loved this spring line so much. The stitching added a cool look to each sunburst and don't you still love the butterflies by Jenni Bowlin? Those another product favorite!!!

Here is sort of another take on the sunburst look from 2010. I actually cropped the photos to fit inside the rays. This page is one of my favorites. I love all of the fall elements to it. I can't remember what companies make what, but I know a few are by Crate Paper. Again, I used my ruler exclusively to measure those rays.

Here is my very latest sunburst effect page. I created this page the other day and it utilizes the multicolor sunburst patterns that are very popular right now. I loveeeee a paper by Simple Stories which inspired my design. I have that paper, but I am afraid to use it, because than it will be gone. You know what I mean right??? LOL. I used almost all My Minds Eye Paper and embellishments. I love their newest released, don't you?

Thanks for taking this tour over time with me. If you have used a similar technique over the years, send me an email at scrappingpam73@yahoo and I will feature you!!! Have a great weekend!!
Subscribe to:
Posts (Atom)