Planning
First things first, I always plan my mini albums out. Here are the planning steps I go through:
1. Pick my topic.
2. Pick major products – mini album type and patterned papers.
3. Create a page + picture list.
4. Gather potential embellishments.
Now let’s go through these steps:
Topic? Done. Major products?

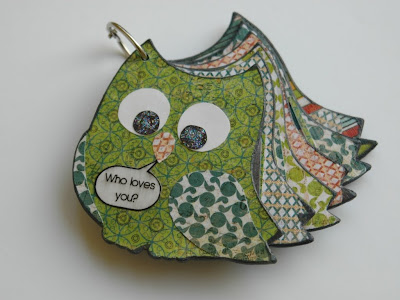
I was inspired to finally put this album together when I first saw this Maya Road Owl Coaster set. Perfect! And it inspired my title: “Who loves you?” I love the play on words! But what paper to use? I wanted to make sure I got something bright and colorful. Kid friendly? My thought it to go with something distressed so that it will help hide the dings and love this kid is going to give it! Obvious choice is to use some Basic Grey and I’m in love with the new Wander collection, so easy choice!
Usually at this point, I would gather all potential embellishments. In this case, I’m going to make this book the opposite of my normal work - minimal embellishment. I don’t want those cute little hands ripping off and chewing on anything small that might be a choking hazard!
Designing
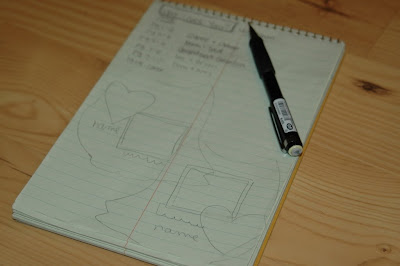
I usually come up with a basic design for the pages – it makes it go more quickly in assembly. For this album, I wanted to keep it simple and fun. Each owl will have a photo, a basic frame for the photo, a name and one small paper or sticker embellishment. Alongside creating a design for the layout, I usually create a gameplan… a page + picture list:

Building
Once I get to this stage, I want to get done as quickly as possible.
First, I grabbed all my owls, some coordinating colors of Maya Mist and sprayed five of the owls on the back side to begin building my mini album. I kept the colors light so I could add a second layer of texture with stamps. I’m trying to add some depth without thick embellishments.

Then, I cut out seven owls – one for the front cover, one for the back cover, and one each for the front side of the pages. I did this by just holding one of the chipboard owls up to my paper and using it as my cutting guide.
Finishing
Now for the final steps, building the covers and sealing the album.
The covers were the most fun! I used the embossed image that came on the chipboard as a paper piecing template by tracing it onto tracing paper and cutting it out by hand. I then sketched out what I thought the owl would look like from behind and cut that out too. I used my tracing paper templates to cut out the patterned paper. I glued it all down with permanent adhesive.


Once all the misting, stamping, gluing and distressing was done, I added one last layer of distressing by inking the edges with distress ink. Then, I added my papers, photos, names and small embellishment to finish the pages. To make these as kid friendly as possible, I printed the photos out on smooth cardstock to make the final step of the mini album easier.
Next the critical kid proofing step… modge podge! I grabbed a big bottle of it, some foam brushes and then got to work. I covered one side first, let it dry and then repeated on the other side.

Now it’s all shiny and kid proof! A simple ring to hold it all together and it’s ready to go!!

Kid-Proof Tips
- Subject: Something that suits their interest and is recognizable to them.
- Chipboard: Much more durable than paper! Board books at the store are the same as the chipboard we all buy!
- Have Fun: Pick something fun shaped to capture their attention. Squares are fun, but an owl? Way more interesting!
- Colors: Bright primary colors are the obvious choice. Any fun, colorful patterned paper would be perfect!
- Distress: To help hide the kid wear + tear. They’ll help you distress it more when they get those little hands on it!
- Less is more: Kids want the pictures and colors… the fun shape. They don’t care about all those extra doodads we love to add!
- Modge Podge: Seal that baby up! Make it smooth and shiny. It will help it withstand those cute dirty little hands playing with it! Make sure everything you are using will take the modge podge – I printed my photos on cardstock to help with this. Anything that won’t work with modge podge, make sure you add it after the modge podge!
I’d love to hear what you think and see any kid friendly mini albums you have made! And thank you so much Pam for having me as your guest today! :)
(CLICK HERE TO LEARN MORE ABOUT AMANDA)


Oh I love that idea!!! so so cute! TFS!
ReplyDeleteAdorable project! Wander is perfect for that. I love the simplicity.
ReplyDeleteSuch a cute mini album, love it!!
ReplyDeleteBeautiful!!! that looks gorgeous and I'm sure it will be treasured! :)
ReplyDeleteI have made some mini books for my own kids with pics of fave family members and for the first one I actually laminated the pages after scrapbooking them (although the embellishments had to all be very flat).
'cause yah, those little books need to stand up to a lot of touching and being toted around! ;)
This is really amazing!!!!!!!!!
ReplyDeleteHey Amanda!
ReplyDeleteThe mini is awesome and I really love that you shared our process and steps with us. Good stuff!
What a great Idea looks like I just found some great Christmas gifts.
ReplyDeleteGreat album!!! So cute!
ReplyDeleteamei esse blog parabens, e gostaria de fazer a coruja vc tem o molde pra mandar pelo meu emial?? fico agradecida..beijos Solange
ReplyDeleteSuper cute mini-album! Love it!
ReplyDeleteOh this is SO cute Amanda! I really love the papers you used and the fact that you planned it out so well. Absolutely adorable!
ReplyDeleteHi Amanda
ReplyDeleteI have been following you for a short period I would just like to introduce myself I am Sue from N.Z. I just thought your little mini Album is wonderful what a fabulous idea, the way you planned it through is impressive also. The envy of many I would suggest to those of us who just pick up some paper and see what happens. I will call in often.
Smiles:)
This comment has been removed by the author.
ReplyDeleteThe tips you share is very helpful to me.Thank you so much for sharing your talent.EPSON Ultra Premium Luster Photo Paper
ReplyDelete