Showing posts with label Recycle. Show all posts

Monday, December 3, 2012

Trash to Treasure

Cindy here!  I've mentioned before that I am a huge fan of trash-to-treasure projects.  I hate throwing anything away if it can be used for another purpose.

One of the many hats I wear is "Flamingo Four" coordinator for Flamingo Scraps. Each month, three other members of the Design Team and I each design with the same four products.  This month, we received Glimmer Mist, some wood veneers, some lacy trim and something that might be ordinarily considered trash - an empty Maya Road tin.
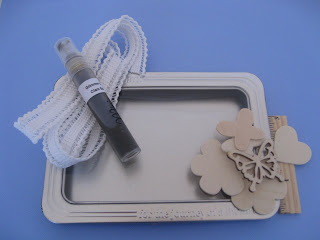
 
This is exactly the kind of challenge I love!  I thought about what I could store in the tin and let my design go from there. My son Trevor needed a place to store the flattened pennies that he's recently started collecting; the tin was just the right size.

The first step was figuring out how to cover up the brand name and slogan on the tin.  What would stick to the metal of the tin AND cover up the words without interfering with the closure of the tin?  Washi tape!  I layered torn bits of washi tape and it worked beautifully. 

 
Because Trevor's pennies are from our travels, I decided to back the opening with a map.  I found a 10-year old map of the western US that I haven't used in years.  I cut out the section of California where we live and attached it to the opening.  I misted the heart veneer, then I cut apart the trim and misted that.


When the mist was dry, I attached the trim and then added the heart.  


The tip of the heart points to where we live. 
 
Trash to treasure!  Have you ever made anything from an empty Maya Road tin or other manufacturer's packaging?  I'd love to see it!


Friday, May 25, 2012

From Trash to Treasure

Cindy here!  It always amazes me what other people throw out.  I'm sure it's the crafter in me, but I have a tendency to look at 'garbage' much differently than my non-crafty friends do.

Here is a gift box and card I made recently.  I used four items that many people would throw away.  Can you guess what they are?


The box once held Girl Scout cookies....


... and I used a pill container, empty roll of tape and a drinking straw for the stamping.


Here's a gift bag I made using the empty tape roll, the straw and one more item:


The third (orange) stamp was an old sponge dauber.  You know what they say: one man's trash is another man's treasure.  Why spend money on circle stamps when these are free and just as cute?!


Here's a sympathy card I made.  Check out the 'patterned paper' on it.


It's actually the inside of security envelopes!  Thanks to Pamela #8040 for the inspiration!

 
From trash (well, recycling actually) to treasure!  


Thursday, December 8, 2011

Advent Calendar

Advent is a period of preparation for Christmas.  In the church calendar, it includes the 4 Sundays that precede Christmas Day.  A typical Advent Calendar counts down the days from December 1st through Christmas Eve.

I made an Advent Calendar a part of our family holiday tradition when my children were very young.  It was a real help especially for my kids with special needs. It helped them manage their anticipation and kept them on track as to what to expect. They were easily upset by changes in routine, and there are certainly a lot of those during the holidays!  We've kept up the tradition of using an Advent Calendar each year.

The one that we had been using is a bit "young" for us now. This year I decided that I wanted a new way to count down the days that was more suited to my family.  So I created this Advent Calendar using digital scrapbook papers, traditional scrapbook elements, recycled cardboard and curtain trim.

I recycled two pieces of cardboard that some scrapbook papers shipped on as the base for the calendar.  I attached them to each other and created the hanger using recycled curtain trim.  I printed out digital papers from the Comfort and Joy Collection by Sugarplum Paperie. I then created pockets and tags using the papers.


Then I adorned each pocket with holiday goodies from my crafting stash.  I added ribbon to each of the tags and slipped them into a coordinating pocket.  I adhered the pockets to the cardboard base. 12 pockets on each piece. I must confess, of all the crafty things that I collect, I seem to be very attracted to Christmas items. I love Christmas papers and elements!  So this really helped me use up some of that stash that has been accumulating!

Rather than pre-print each tag with an activity, I got some holiday colored paper and re-positional adhesive (like the kind used on Post-it notes). I write an activity on those papers and adhere them to a tag. This gives me a lot of flexibility. If the night that we planned to take a stroll to view holiday lights ends up raining, I can just switch it for a different day.

I hope this gives you some ideas for creating an Advent Calendar for you and your family!

Happy Holidays!

Monday, September 12, 2011

A Place to Hold Your Phone


Want a quick little craft that not only helps organize your desk/home, but also recycles and helps the environment?  I made this phone holder from an old gift card.  Here's a freebie tutorial for you so you can make one too!

Start with the gift card that you have. Make sure you don't have any value left on it, I wouldn't want you to miss out on any shopping bargains! In my case I'm using a store rewards card from a store that has gone out of business.  Makes me sad to see them go, but at least I've found a good use for the card.

Cut cardstock or patterned paper to fit the card. Gather elements that you want to use to decorate it. I used digital papers and elements. I printed out the background papers that I wanted to cover both sides of  the card with. I created the design block in Photoshop and printed that out. By making the design hybrid with digi elements, it also keeps it flat. Whatever you decorate this with, keep in mind that you want it to be as flat as possible.

Bend the card in to the shape for the holder.  I laid my metal ruler across the card as a straight edge and then bent the card up against the edge of the ruler.  I put the folds at about ½" from the one edge and about 1 ½" from that fold. Note that the folds go in opposite directions.

Apply adhesive and adhere the paper to each side of the card. Add your embellishment design and there you have it!  A new place to hold your phone!

And it works both vertically and horizontally. Well at least it does for my phone!  Hopefully for yours too.

Thursday, July 21, 2011

Working with "Found Objects"

Sometimes when we are preserving memories, we would like to include "things" in addition to our photos and journaling.  Often there is memorabilia from an event that we attended, or ephemera from a certain time frame that would we like to have on our pages to conjure up our memories and emotions.

Today I'm going to share some projects that include "found objects".  One of my sons took up collecting bottle caps. It was really fun. Different places we would visit he would save bottle caps from beverages that we might have enjoyed. Some bottle caps he would find at the beach or park.  I thought it was great that he found such interest in building his collection.  He added them all to a stylish jar that he keeps in his bedroom. One day I came across an interesting bottle cap that I thought he didn't have. When I offered it to him for his collection, he told me that the jar was filled so he was done collecting!

He is rather shy, he has autism, and doesn't like to have his photo taken often.  I recently got a good photo of him. I've been wanting to record his bottle collecting for quite some time. I'm so glad that he allowed me 2 caps from his collection to include on this scrapbook page.  I adhered the caps to some copper metal that I embossed and sanded.  I also included a clothing tag from a pair of shorts that I bought him this summer. I really like the grungy, mildly distressed look of it. I added a fabric tag from Little Yellow Bicycle to it and attached it to the page as an element.

Now check out some samples from the other contributing artists.  Lisa shares a page that she made after rummaging through her husband's fishing gear.  That is real netting that she used to frame the photo.  It really adds a feeling of the sea and lots of texture!

Heather is sharing two projects with found objects. In the first, she admits her addiction to coffee. And what better way to do so than to include an actual coffee filter that she has inked brown, as well as stamped mug rings made using a real mug!

In her second project, I absolutely adore how Heather has expressed that even in the chaotic world of being a very busy woman, having her toes painted can make all the difference. She has included a pair of  pantyhose (complete with well earned runs) to express her emotions.

 Vicky has also shared some projects using found objects.  In this first one she has included some thin cork.  What a great accent this makes. Adds texture, dimension and color to the page. I'm really liking that feather too!

On this page Vicky included some twigs. Look how she used them along with rolled paper and flowers to extend the beauty of the blossoms. All of her elements keep the concentration on the natural beauty in the photo.

I find myself constantly looking at items and thinking about how they can be used on a scrapbook page or in a craft. I love to use the metal from beverage cans for making flowers, coffee filters for creating accent elements, and even using toilet paper rolls to create mini-albums.  My family has learned not to throw things out before asking me if I want to keep it for crafting. Which has created a storage challenge of sorts!  

Take a look around you. What "found objects" can use on your next project? We would love to see what you create. Email them to me at scrappycath@gmail.com with "Found Objects" as the subject and I'll include you in an upcoming "Reader's Pages" post.


Tuesday, January 18, 2011

Hybrid Wall Hanging and Some PS Tips.

Today I'm going to share a fun project to create a bit of wall art. This would make a great gift, maybe for a house-warming or, as in my case, to dress up a wall in my own house!  Since I did this as a hybrid project using digi papers, I'm also going to share some Photoshop tips.

To make this project you will need:
  • chipboard for backing
  • patterned papers
  • flowers, trims, gems and other embellishments
  • clips or brads
  • lace, ribbon or string
  • adhesives
  • scissors or craft knife
For my backing I recycled the packaging that my Epson Premium Presentation paper came in. I cut it into a bracket shape. 
I used digital papers for my background. The papers are from the collaborative kit Family Branches by Creations by Rachel and Inspirations From Day. I wanted to have several of the papers as my background.  So I created a blank 11x8.5" file in Photoshop.  I then created 1" stripes using the rectangle tool. I colored each stripe a different color to make it easy to see each of them.
Once I had the stripes set up, I opened the first of the papers and dragged it onto my stripe file. Place the paper image above the stripe shape where you want it. Then clip it to the shape below.  To do this hover your mouse on the line between the paper and the shape layer, press and hold the alt key on your keyboard, then click your mouse. Your layers palette will look like the above image with the paper layer indented above the shape layer and an arrow pointed from it down to the shape layer. This means it has been clipped to that shape layer.
Your design will now look like the image above. Notice how your paper layer is only showing where the shape below it allows it to be revealed.  This is also referred to as a "clipping mask".  Continue to repeat the process, placing paper layers above each shape and "clipping" them to the shape below until you've filled the design with all the digital papers you desire. Print this out. Adhere it to the bracket shape that was cut from the chipboard and trim.

If you are using traditional papers, you can simply cut strips from your selected papers and then adhere then aside each other on another piece of cardstock or directly onto the bracket shape background. Trim it to the bracket shape.
I sanded and inked the edges of the background.  Now comes the fun of piling on your embellishments.  I had created the framed word art using elements from the same digital kit in Photoshop, printed and cut it out.  I layered the gems, flowers, foliage, trims, chipboard accents and elements using glue dots and foam squares to adhere.
To create the hanger for this project I threaded some lace through the eyelet on mini clips and tied a knot to secure it.  This made a really simple yet elegant way to display this wall art.

I hope this inspires you to create some awesome wall art for your home or for someone special.

Tuesday, October 5, 2010

License to Create

Want a cool idea for vacation or travel albums? How about using a license plate? When I was designing an album about a summer vacation to the Jersey Shore, that's what came to mind for me. I grew up in New Jersey but no longer live there. I was able to recycle an old license plate. I love to recycle or re-purpose items so that made this idea even more appealing.

Photobucket

For the pages of the album I used chipboard pages by Little Yellow Bicycle. They were sized just right to work with the license plate as a cover. The chipboard had holes already drilled on the short side, so I decided to orient the album hinge this way. Ring binders provide the hinge and are embellished with ribbons, twine and beach related charms. I attached a leather strap closure by Zutter using rivets. Holes can be punched into the license plate using a Crop-a-dile or other hole punch tool.

To protect my pages, photos and journaling, I applied Mod Podge sealant. This album is a hybrid project. I used a combination of traditional and digital scrapbook products to create it.

Here is a glimpse at the pages and back cover
Photobucket
Page 1

Photobucket
Page 2-3

Photobucket
Page 4-5

Photobucket
Page 6-7

Photobucket
Page 8-9

Photobucket
Page 10-11

Photobucket
Page 12-13

Photobucket
Back cover

The back cover has journaling on it which reads "The best vacations are those that keep you looking forward and dreaming of doing it all again" I thought these 2 photos went so well with that thought they deserved to be the very end of the album!

If you are looking for a unique way to remember a great trip, special event or travels you've experienced, why not consider re-using a license plate? You can find them on eBay and other internet sites, at junk yards and maybe even in your shed or garage.

Here is a list of products that I used in creating this album:

Patterned paper: Boardwalk Collection Little Yellow Bicycle
Chipboard Album: Little Yellow Bicycle
Digital kits/elements: Drift Away by Graham Like the Cracker; Sea Sand Sun, Kids at Play by ScrapMatters Collab Team; Sail Away, Sunburn Savvy by Erica Zane; At the Beach by The Design Girl; Vintage Carnival Tickets by Jenn Barrette; Precious Memories by Laitha's Designs; Life's a Beach Snippettes by Sahlin Studios; Vintage Carnival by Sahlin Studios
Sealant: Mod Podge Hardcoat
Ribbons: American Crafts, Michaels
Charms: Blue Moon Beads
Leather strap/Rivets: Zutter
Glitter: GlimmerMist, Stickles
Stickers: K&Company
Alpha: Making Memories
Flowers: Prima, Petaloo
Gems: Zva, Queen & Co
Ink: Ranger; Colorbox