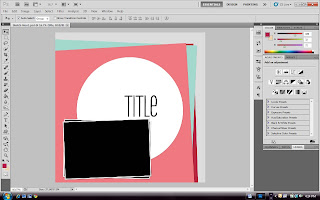
I use Photoshop CS5, but I am sure most functions I will use will be available in all versions.
First I am going to assume you have some digi scrapping elements, papers, alphas to use. If not, I love Creative Busy Hands (link: http://scrapbook.creativebusyhands.com/ ) for awesome freebies.
Now, you have to have a template to work with. Look over to the right hand side, and start downloading!
Go ahead and open up Photoshop.
And locate on your hard drive a template you wish to use.
Now the good thing with a template is that everything is layered for you. All you have to do is start to plug things in. I always work from the bottom up. I never really know what angle I am going for. But I normally stick to one kit unless it’s for a digi scrap challenge or something.
So for my tutorial I am going to use a new kit that I received and I need to make a Layout anyways. (Work smarter not harder!)
Any who, so we have the first layer. If you notice in the bottom right hand corner you have your layers labeled for you. The background is what I will start with.
Now to insert your digital paper into this spot you want to go to file/PLACE. Not OPEN. PLACE means you are going to place it on the particular workspace. If you OPEN another file you are going to start another work space and things just get pretty messy.
As you see it is an exact fit, if it wasn’t I would then stretch it out. You see the paper highlighted with the lines and dots in the corners. That means it in “Transform” mode. You can transform it, bigger or smaller. But since it fits just right I will just hit ENTER.
Now on to the next layer. Go ahead and locate another digi paper on your hard drive you would like to use. By using FILE/PLACE.
If you notice it is the same size as the other paper. You can’t even see the blue one I first inserted. This is where CLIPPING MASKS come into play.
You are going to hit ENTER to place you paper, no need to make smaller or transform. This is the MAGIC of clipping masks.
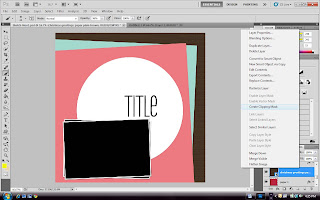
You will now want to RIGHT CLICK on the paper you JUST inserted. And click Create Clipping Mask.
Once you click create clipping mask you will notice that the brown paper I just inserted is now the correct shape of this particular layer in the template.
You will then continue to do this will all your layers available in your template. Now with the TITLE layer, you are going to want to turn that off. (with the little eyeball next to the layer) And you can place your own alphas or texts.
Now with elements such as buttons, ribbons, glitter,etc you can just add as you wish. Using the same method FILE/PLACE and you can move them around as you like. This particular template does not have place holders for elements but many templates do.
Here is my finished layout.
I hope that made SOME sense, and didn’t totally confuse you guys. That was the basics of using a template in Photoshop. If Pam will have me back, maybe I can go into more depth such as overlays, drop shadows, etc.
It was great to be here and you can head over to my blog (link to http://blog.paveiphotos.com) to see what I am doing with my photography business, what I am scrapping about…or even what my kids tore up! LOL.
Have a great weekend!!
(CLICK HERE TO LEARN MORE ABOUT LARISSA)


Thanks for the tip on the file/PLACE. I've been doing it the messy way. This is soooo... much better.
ReplyDeleteGreat tutorial Larissa! Thanks for sharing!
ReplyDelete