Wednesday, December 16, 2009

Cirles and Curves Template!

I am going to attempt to use this template this week ... hopefully. I got it done today and thought I would share with all of you!
Here is the FULL template. You will probably need to print this out in two sections since it fits nicely on 12" by 12" page. Save it to your computer and open with another program. Print in a few sections and tape together. You can use that to trace onto your photos and cardstock. Notice there are also some fun journaling strips on the bottom.

(Click on each individual image and a larger sized image will appear)

This is just the photoblock. You can use it for any page, not just this one listed above!


And this is the full sketch! Enjoy!!


Digital scrapbookers can download the digital layered template here:
http://www.4shared.com/file/185752739/6a110ae0/pc_circles_curves_template.html


Tomorrow check back to see some example of other templates by Sarah!

Danielle's Favorite Holiday Project

Hi everyone! It's day two of the contributor's favorite project and Danielle's turn! I think it's neat to see people's favorite pages and to find out more infomation ... so here is Danielle's adorable favorite holiday project and questions I asked her!


1. Why is this your favorite Christmas project? What is the story behind this?

I just love this project because of the memory! Isn't that what scrapbooking is about? It was my daughter's first time decorating holiday cookies and it was adorable! She was getting so messy! We eventually striped her to her diaper only! By the end she was covered in flour, icing and sprinkles! It was so special because both her grandmother and great-grandmother were there to help pass on the tradition!


2. What helped you create this page? What are some tips for creating this? What is your favorite part about the project?

I am happy I was able to fit so many photos on it. Don't be afraid to add small photos to your creations! The photos I used were full of many different colors, so I chose a few to bring out in my patterned paper - blue, pink, and green. My favorite part of the project is most definitely the photos!


3. What is your favorite holiday tradition?

You see it in my layout - baking and decorating sugar cookies!!!!!


Thanks for sharing your fabulous page with us, Danielle! Stay tuned because more favorite pages will be starting again on Saturday! Tomorrow is a post by Sarah and Friday is the featured artist for the week!

Tuesday, December 15, 2009

Melanie's Favorite Holiday Project!

Today, part of this week and all next week I will be featuring the contributor's favorite holiday pages and projects! Today is Melanie's turn! See why she considers this her favorite and I think it's pretty special too! Here is her favorite project and below is questions I asked her. Enjoy!


1. Why is this your favorite Christmas project? What is the story behind this?

This project is my all time favorite because of the man in the Santa suit. No, this isn't the REAL Santa, it's one of his wonderful helpers. A helper who always makes sure that he does everything exactly how Santa would want it done. He's been known to carry two pairs of boots and change them before stepping inside a house (Santa's boots would never be wet, now would they? He rarely touches the ground thanks to those flying reindeer of his.), he catches up on all the local school's information. He knows most of the teachers and principals in the districts and makes sure to drop names whenever he can. OH, and most special of all - he's mine! Sort of, this is my Uncle Cliff and he's been making Christmas wishes come true for several years now. Too bad Noah didn't think he was so great this year!


2. What helped you create this page? What are some tips for creating this? What is your favorite part about the project?

My favorite part of this project is the non-traditional colors. The pinks and browns make the page pop. Sometimes I think that non-traditional colors paired with the traditional reds and greens make the more traditional colors pop. Just a hint: next time you stamp a Christmas image and color it using basic red and green...mask your image and sponge some light blue ink around the sky area, your reds and greens will look dazzling!


3. What is your favorite holiday tradition?

My favorite holiday traditions are the special ornaments that we always add to our tree. The Christmas Spider is always, always present and its a wonderful story if your not familiar with this one (Do an internet search for Legend of the Christmas Spider and you'll be sure to find the tale.). We also traditionally hide the Christmas Pickle within the branches of our tree and let the kids try to find it. The finder of the pickle gets a special gift.


4. Anything else you would like to share.

We try to keep our holidays a time of wonder and suprise, family, friends, and foods, sights, sounds and laughter. My wish is that you and your experience this and so much more this holiday season. May your holidays be filled with health, wealth, and happiness!

Thanks Melanie for sharing you creativity with us!!!!
If you noticed, I got mixed up.. this is Melanie's project, not Heather's!

Monday, December 14, 2009

Last Minute Gifts

Did you just realize that you forgot to get a little something for the mailman, the teacher’s aide, or the bus driver? Never fear…I’ve got a quick gift idea that will be perfect for almost anyone! Let’s make a cover for a 3 x 3 post-it note pad. It’s perfect for leaving by the phone or keeping it in your purse or car for those times when you need to write a note.

You can use your scraps for this. Make it a holiday gift, pink or blue for the mom of a new baby, or just use something to make it an everyday note pad.


Aren’t these adorable? Here’s a little pattern to help you get started.


I recommend using cardstock weight paper for the cover. Cut your cover 6 ¾ inches by 3 1/8 inches. Score the cardstock at 3 1/8 inches from each end which will give you a ½-inch stripe in the middle of the cardstock. Fold on the scored lines.

It’s easier to decorate the cover before you insert the 3 x 3 pad. Just add scalloped strips, ribbon, a button, heart…just whatever you’d like to do to dress it up a little.


On these two, I just added a little stamped phrase and a punched flower on the green one and a couple of scalloped strips and a flower on the pink one.

After you get it decorated, use strong glue or glue strips on the inside of the back and on the ½-inch strip across the middle. (I use my glue pro gun, but sticky dots or any type of permanent glue will work)


Press the pad in good and then fold the top down. Make sure you’ve pressed all the glued spots firmly. You’re DONE! If for some reason, the front cover wants to kick up, just tear off the first 2-3 pages of the note pad.


I made all four of these in about 40 minutes. You can’t get much quicker than that. I might just leave one of these by my phone. It looks much better than just a plain pad!

Sunday, December 13, 2009

Teacher and Classmate Gifts

So many parents get stressed out over the age old question – what do I give my child's teacher for Christmas? Or worse yet, what about the classmates? Or the bus driver? If your crafty, teacher gifts shouldn't have to bring you to tears, it's simple, everything looks better in a pretty package.

Some people pay $50 or more for classy and elegant stationary and gift sets, but come on, is the paper in that notepad really any better than the $1.99 for 3 counterpart sitting right beside it? Of course it isn't, retailers simply know that if you put something in a pretty package it sells better. So rule one of great teacher gifts – DRESS IT UP.

Another tip with teacher gifting is to simply remember that she probably, if she's been in the profession for any length of time, has it ALL. There are only so many mugs and paperweights and ornaments to be bought, so when you pick your gift think outside the box. One thing that comes to mind in particular this year is school supplies. Due to the economic crisis many schools were forced to cut the teacher's supply budget putting more responsibility on the teacher to buy class supplies. So why not gift what she probably already needs? Pick up supplies on after school clearance racks for this type of gift and you'll look impressive while keeping your own costs down. What types of things would be useful? Think composition books, crayons, colored pencils, markers, glue sticks, scissors, etc. Taylor your items to the grade level of your child (if you couldn't tell, we still deal with preschoolers here...lol.) Same thing goes for the bus driver, he probably doesn't need another travel mug (Shouldn't be drinking and driving anyway, right?) and he's probably got 3 fruitcakes stashed away from his last 3 stops. So what's a mom to do? I can honestly say, in this household anyway, I don't think twice about gifting the bus driver a nice (and small) gift card for the local coffee and donut shop. We keep it simple and inexpensive at $5, enough for one coffee and one donut or breakfast sandwich. There is no need to buy his breakfast for the next year. Package it in a nice gift card holder or a small decorated gift bag and your good to go. So, to recap, rules 2 and 3 – KEEP IT SIMPLE AND PERSONALIZED and DON'T BREAK THE BANK, SMALL IS OK.

So, you might ask, how do I pull all these off and still make it look impessive? It's easy and I'll show you. Go to the dollar store and gather up a few supplies. For this example I bought...

A colorful bucket (Target usually has these in their $1 section every season. I happened to pick these up in the summer months and they were bright and colorful.)

Some shredded paper or, as I've shown here, some $.99 tissue paper (If you have a paper shredder at home, this is even easier, put some colored scraps through there and shred your own.)

A few fillers (My son is giving this as a gift to his “play date” friend.) here I used Markers, some Safety Scissors, and some mini Play Dough Tubs and cookie cutters.

Add some ribbon and you've got it!


Now, just a few tips about arranging it.

  1. Make sure all the contents of your container can be easily seen. You can make things more visible by putting paper shreds or tissue paper directly into the base of your container.

  2. Keep larger items to the back and smaller, less visible items up front where they can be easily seen. Use crumpled tissue paper or paper shreds to hold up smaller items so they don't slip to the bottom of the container.
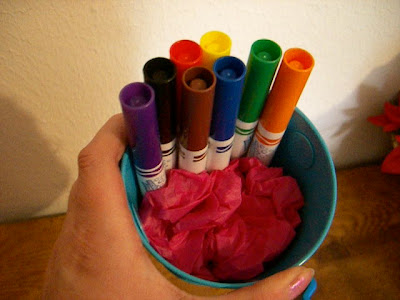


  1. Make good use of product packaging (colors, designs, etc.) but if packaging makes something too big to fit or too bulky, don't be afraid to discard it, as I did here with the markers.

  2. Arrange everything in a pleasing manner and don't be afraid to re-arrange until you like what you've got.

  3. If a small object doesn't fit (example, the cookie cutters I added) tie it onto a fun bow as an accent.

  4. If you wish, you can buy inexpensive rolls of cellophane at most craft stores to wrap up your finished creation. Add a great card and some ribbon and you've got a fun, personalized gift.


You can hop on over to my blog to view more of the gift items I've been crafting this season. Have fun making a personalized gift for your special teacher!


Saturday, December 12, 2009

NEW CONTEST/CHALLENGE!!

Here are the details for a brand new contest!!! There will be TWO winners, one $35 dollar gift certificate to the scrapbook.com store and one prize pack from me :) . The end date is Jan. 31st midnight EST and the contributors for this blog will pick their favorite pages. Winners will be announced on Feb. 4th and their layouts will be posted here on this blog!

Here is the link!! Please follow this to learn all the details.
I am posting this on scrapbook.com! Please either post your pages at the scrapbook gallery and link it to the thread or you can email me your entry to scrappingpam73@yahoo.com .

"L" Shaped Template!

Hi all! This is a brand new one I created tonight! This was inspired by a much older layout I did and I wanted to replicate the shape! It is perfect for four smallish photos and would look great as a holiday layout or any occasion! It would look so cute with some Christmas tree photos and your "ornament" embellishments on the top and side in place of the flowers!

First is the template, feel free to play around with the photo placement and embellishment sizes to get a whole different feel! Print and play!

(Click on each individual image and a larger sized image will appear)

Here is the photoblock template with the photos and other stuff! Print and trace onto your photos! I included a place for extra cardstock on the outside if you are looking for that!

Lastly, I know people love sketches ... so here you go!

Here is the digital layers download!
http://www.4shared.com/file/186302137/ebbd8cae/pc_Lshaped_template.html

Tomorrow (well today for me!) I will announce the new contest and you won't want to miss it, so be sure to check back later in the day! Have a good one!