Showing posts with label Product Review. Show all posts

Tuesday, August 27, 2013

Gael's Picks of New Products!

Hi, its Gael here today and I’d like to share with you some of the new products recently released at CHA.  These are just the ones that took my eye and which I’m really looking forward to seeing in the stores.
I have a love for vintage/heritage collections and I’m so thrilled to see so many companies have new ranges coming out.  I’m just not sure how I can pick my favourites but I’m sure I’ll be seeking out the following collections.
Webster’s Pages – Postcards from Paris II

Prima – Vintage Vanity & Everyday Vintage


I’ve also just started getting into the Project Life style of scrapbooking and luckily for me they have also brought out a Heritage kit, so I’ve got this one on order already!!
Project Life – Heritage kit

Some other goodies which I would love to try out include the Color Wash from Pink Paisley and the Color Magic from Heidi Swapp. 
Pink Paisley – Color Wash

Heidi Swapp – Color Magic
 
There are so many fun new products coming out that I found it really hard to decide on a few favourites so I’m really looking forward to seeing what products other people are looking forward to trying.  


VISIT THE CONTRIBUTOR'S BLOGS/GALLERIES
Cathy Dippolito
Dolores Schaeffer
Cindy deRosier
Lesley Walker
Gael Spence
Sarah Routledge
Sharon Fritchman
Tanya Ham
Sheila Burns
Pam Callaghan


Monday, August 26, 2013

Pam's Picks of New Products

Howdy all, it's Pam here and I am sharing my picks of new products from the summer CHA show. In case you haven't seen it, here is a excellent listing of all of the products released in July: http://www.scrappyjedi.com/p/cha-summer-2013-sneak-peeks.html . All week you will see some of the contributors' picks for new products! It will be so cool to see what everyone likes. Btw- I know this post seems late after the CHA show, but this is when the time when the products start hitting the shelves, so it seems like a great time. The contributors or I are not getting any compensation for their picks, they are just posting stuff they like :)

So, let me get started!!

1. This summer there was so much to chose from, which poses a problem when it comes to picking stuff. My first pick is a collection called Memorabilia by Theresa Collins. The colors are right up my alley along with the blackboard accents. The paper really spoke to my style and I want just about all of them. Here are a few highlights of my favorite!


2.  My next pick is a bright and festive collection from Pink Paislee called Hey Kid. When I first saw the sneak, I KNEW this was going to be something i wanted!  Bright colors such as yellow, teal, pink, red, orange and so much more!! I love all of the circular acccents, die cut papers and various patterned papers. Here is just a few of the ones I like ;)


3. The next one I just love is by My Minds Eye called Cut & Paste. This has mini collections to it and there are certain color combos that I adore. I tend to go towards the more masculine color line (even with a little pink) and even if it has floral in it! I also love their brads. I am posting a few different papers and brads that I love from this collection!


4. Lastly, as you might know, I am addicted to sticker sheets right now. These sticker sheets from Simple Stories are a must get for me! Check out it.


Are you surprised by my picks? What are your picks? Stay tuned this week for more contributor picks.

VISIT THE CONTRIBUTOR'S BLOGS/GALLERIES
Cathy Dippolito
Dolores Schaeffer
Cindy deRosier
Lesley Walker
Gael Spence
Sarah Routledge
Sharon Fritchman
Tanya Ham
Sheila Burns
Pam Callaghan


Tuesday, April 30, 2013

Comparing Alcohol Markers


Cindy here!  Do you use alcohol markers in your scrapbooking or cardmaking?  Alcohol markers burst into the scrapbook scene a few years ago and now many consider them to be a staple of their crafting.  My first experience with alcohol markers was about 4 years ago when I first tried Prismacolor markers. When I blogged about how much I love them, a friend commented if you compare Prismacolors with Copics, the Copics win hands down.  Ever since then, I've wanted to do a side-by-side comparison to decide for myself.  I finally got the chance when a friend brought her Copic Sketch markers along during our recent scrappy get-together.

The first thing I noticed is that the basic nibs of the two brands are quite different.  The Prismacolor's wide end is somewhat wider than the wide end of the Copic, and the fine tip of the Prismacolor is significantly smaller than the fine tip of the Copic.    

 
I should mention that Copics can be refilled and the nibs can be replaced (or exchanged for different sizes).  Neither of these is true for the Prismacolors.  But my goal was to compare the two brands as they are sold.  While I'm sure that there are many people who switch out the nibs on their Copics, I'd guess that there are at least as many people who use the Copic exactly the way its sold, especially given the cost (between $5 and $8 per pen).  

People who love Copics rave about how well they blend.  I was curious to see if there was a noticeable different in blending between the two brands.  I drew lines, colored designs, and filled in some images. I did not find much of a difference between the two.  What I did notice is that it was much easier to fill in tiny parts of a stamped image with the fine tip of the Prismacolor compared to the brush tip of a Copic.      

 
Next, I did a word art project, inspired by Artisan des Arts.  There's a tutorial on her post.

 
I made a second project, filling in all the spaces to see how it would look and to really give the pens a chance to show what they can do.


After all that experimenting, I came to a conclusion: I actually prefer the Prismacolors, mostly because of the fine tip end (which can be bought separately for Copics).  I can see a lot of reasons why the Copics are so beloved.  They are an excellent product, and the environmentalist in me really likes that they are refillable and the nibs can be replaced without having to throw out the whole pen.  The price tag of a Copic Sketch is daunting at double the cost of a Prismacolor, but for serious artists who go through pens frequently, they are probably more cost-efficient in the long run.  

What about you?  Copics, Prismacolors or a different brand of alcohol marker?


VISIT THE CONTRIBUTOR'S BLOGS/GALLERIES
   Cathy Dippolito
   Dolores Schaeffer
   Cindy deRosier
   Marlene Murphy
   Lesley Walker
   Gael Spence
   Sarah Routledge
   Sharon Fritchman
   Tanya Ham
   Sheila Burns
   Pam Callaghan


Thursday, April 18, 2013

Using Versatile Gelatos

Hi, it's Lesley here. I was recently fortunate enough to travel to the State of South Australia and do 5 classes with Steph Devlin who is on the Prima DT.  We covered a number of different techniques with Step and whilst I don't feel I have anywhere near mastered any of these techniques yet, I am having a wonderful time playing around and trying to create a similar style to Steph's without copying her designs.

One of the fun things we learnt was about Gelatos the newly released fun tool to use for scrapbooking.  I see Gelatos as not only adding a fun element to creating your pages, but being able to create your own background's on your pages, I use so much 'white' 
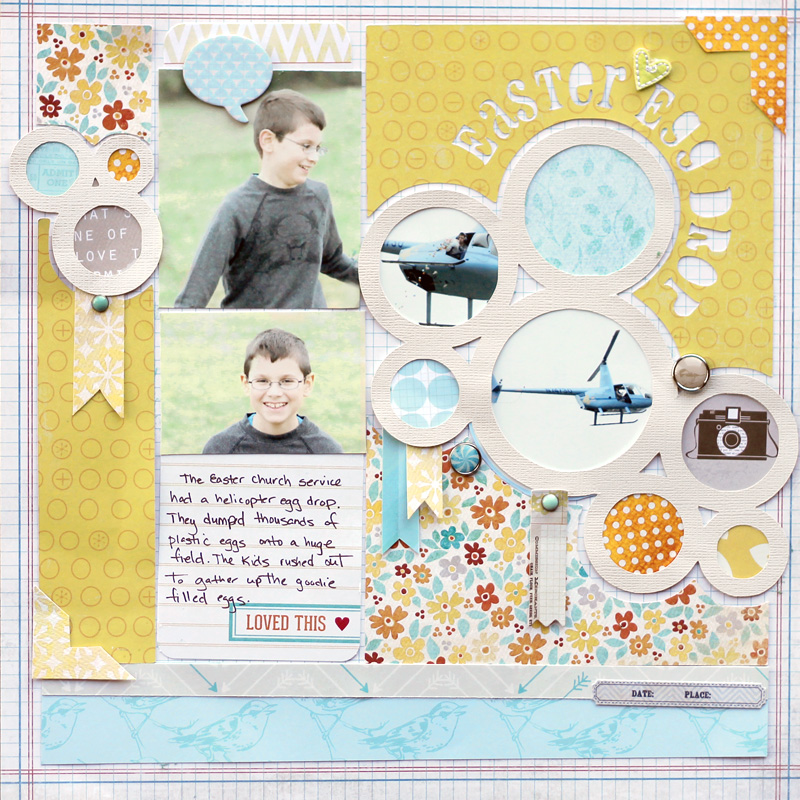
cardstock now, therefore a saving on patterned paper.  On this page I have used Gelatos 4 ways, mainly for demonstration purposes and probably wouldn't use all 4 methods on a page all the time.


Firstly I wanted to give a watercolour effect behind the photo and dies.  To achieve this, because you will be using a water spritzer on your paper you apply a layer of Gesso to the area you want to paint, then when that is dry its as easy as scribbling just like a small child would using the colours of your choice.  Then you spritz lightly with water and using your finger blend the colours together, I've used Orange and 2 shades of Yellow on my background, you only have to use a small amount, and, if the background isn't as you choose you can add any colour to change the shade and it all blends together beautifully.

The 2nd method is using a mask, I've used a circle mask and added the Gelato directly to the paper (no Gesso required), you just blend it inside the relevant shape you may be using and then what I also did was rub my finger off on another circle to achieve a lighter shade.

The 3rd method is creating a mist using the Gelatos.  To do this you simply shave a very small amount off the bottom of the colour of your choice into a paint pallet, again I used orange and yellow, then add just a very small amount of water and using a paint brush mix it until it quickly turns into a paste.  Use the brush to scrape it into a water spritzer bottle and then add more water, you only add a small amount at a time so it remains reasonably thick, yet thin enough to spray.  I probably would only use the yellow shade on this layout at the moment so I only mixed a small amount and then cleaned the spritz bottle out ready for my next project.  It then sprays on just like any other commercially purchased mist.  I  held the paper up so I run a few funs down the page which can be seen on the bottom right.

The 4th method is applying it directly to my chipboard on the left of the page just like you would marker pens, again a small amount goes a long way.

Well I hope you enjoy playing with Gelatos if you get the opportunity, I purchased the large box to start with and then you can buy them in smaller amounts in different or the same colours to add or replace.


VISIT THE CONTRIBUTOR'S BLOGS/GALLERIES
Cathy Dippolito
Dolores Schaeffer
Cindy deRosier
Marlene Murphy
Lesley Walker
Gael Spence
Sarah Routledge
Sharon Fritchman
Tanya Ham
Sheila Burns
Pam Callaghan


Saturday, April 13, 2013

Pam's Spring Layouts and Supplies

Hey everyone. It's Pam here sharing some springtime inspiration with you all! We just moved further south and spring is here even faster than when we was living in Ohio! I just love it. When I went to the scrapbook store a few weeks ago, I had one thing in mind... spring!! Today I am going to share with  you some spring purchase essentials (at least to me) and three pages to inspire you!

When I shop for papers, I don't typically buy all from the same company. I get a color palette in mind and actually search for my designs that way. This last visit, I had spring colors on my mind. I chose bright yellows, teal blues, peach tones, traditional greens, light oranges, and of course Kraft. Kraft paper is like blue jeans to me.. it goes with everything? I don't typically use traditional spring collections as much, plus it is fun to create my own! At the store I also loaded up on my newest favorite thing... metal brads. I cannot get enough of these, seriously!! I hope my product list will help you narrow down your search for spring products if you like to mix it up like me!

The first products I am going to recommend are from The Collectable Collection from My Minds Eye and adorable brads from Echo Park All About A Boy Collection.
Here is my spring scrapbook page!


My second product recommendations for spring are paper from the Studio Calico Snippets Collection and also paper (love these double sided ones) from Fancy Pants Trendsetter collection.
Here is the page I created....


My third page is yet another spring page. I still can't believe I created so many. Here are some more product recommendations for you! I chose Amy Tangerine Yes, Please Thickers and Dear Lizzy Lucky Charm Paper.

Here are links to some products I picked up for spring. This is not advertising. I don't get any money for posting this. I just like to provide links if anyone wants to see them! :)

Monday, January 14, 2013

Sew Easy Circle

Hi, Marlene here, slogging through another Upper MIchigan winter.  It's a good time to scrap!  When I first became aware of the tool to make We R Memory Keeper's Sew Easy heads create circles, I was very excited.    A tool that does something fun and uses accessories that I already have in a new and exciting way is right up my alley.
Here is a link for a video demo (I am not endorsing the website, but the video clearly shows how the tool works http://store.scrapbook.com/wr-71115-5.html?t12-13=we+r+memory+keepers.)  The jig works very well, but took a little bit of practice to get the right pressure adjustment.  It requires a fair amount of pressure, I think more than using the original handle with the heads.  Be sure not to overlap the indentations, they will NOT line up and you'll end up with extra holes.  The measurement for the size of the circle goes from the edge of the holder farest from the knob.  Hold the knob without applying any pressure while practicing your circle and you can measure how much paper you will need for the circle to be complete.  For me the price and concept were just right, I really like this product.
Here is a photo of the product and how I used it for my design.
This is a picture of the completed page.  

Saturday, January 12, 2013

Product Review - Silhouette

Hey, it's Pam here. I must admit, we just moved to a new state a few months ago and I having the hardest time getting inspired to scrap. We went to a local scrapbook store recently and I picked up some pretty My Minds Eye Indie Chic paper. I still couldn't get inspired, not because if the paper, but because of being a new place, etc.  I have always wanted a large die cut machine. As you know.. I do 99% handcutting and I use my Making Memories Slice for letter and small things. I guess I am tired of doing so much handcutting (I will still probably do small amounts still in the future). My husband and I were talking about buying the Silhouette and I decided to buy it!! I still did handcutting (just because I envisioned the My Minds Eye paper being cut that way) on my page below but I used my new machine to cut on the circles, title, and the word, "life".  Here is my newest page and I feel inspired again!!!!


Here is my review of the Silhouette Cameo after one use
It is easy to set up, we had no problems with that.
It cuts like a dream and is so easy to peel off.
You can buy each "cut" for 99 cents which is a GREAT idea. Now more cartridges. I did buy a deal where I would pay a certain amount per month to get a a number of designs.
I love that it is 12 by 12. This is my first big cutter!!
It fits right in my scrap room!!
I can design my own designs and cut them on the software. It doesn't get much better than that for me!
The only drawbacks I can see are having to replace mat and blade, although not sure how long they will last.


Anways, I hope this helped you if you are on the fence about the Silhouette! Let me know your feedback on this product!

Monday, October 8, 2012

Product Review

Hi, it's Marlene to share my opinion of a new product I recently purchased.  I love working with grid designs and am particular about everything lining up so a tool to assist getting things straight is interesting to me.  A couple years ago, I bought a laser square by Westscott, it was about $20 and works ok, but uses hearing aid batteries and they last such a short time that it isn't worth the effort.   When I first saw the video from the summer CHA convention,  the KellyCraft "Get-it-Straight" Laser Square was intriguing, but the price ($90) made me think twice about an order.   My research showed that it operates with a 9 volt battery which solves the short battery life issue I have with my other square and I do like things lined up and admit to being a tool junkie, so I bought one.  It does work well; the light is bright and, so far, is economical with the battery, and the slide function glides smoothly and stays in place.  It would be better if there was another light at a 90 degree angle, things could really be lined up with intersecting vertical and horizontal lines.  I don't get the "LaserSkins", which are just fancy covers, at all and did not buy any.  All in all I am happy with the product, but my first instinct was right, it is too much money for what you get, half the price would be fair and reasonable.
Here is how it works.  
This is a page I made using it.  Now if I could get something that will take a straight photo, I'll be all set.  Photo two