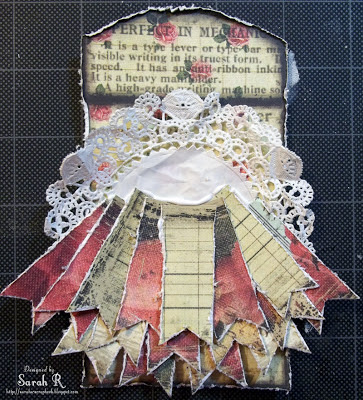
I used the February ScrapThat! kit, which features papers from Prima's "Romance Novel" collection to create this tag. One of the things I loved about the Prima "Romance Novel" papers was that they were made for fussy-cutting and layering. There are so many wonderful small elements on the papers - such as the section of an envelope that I used as the base for my tag. Here's the step-by-step of how I built the tag:
1. Gather all your papers/embellishments. For the tag, I used the envelope base cut from the Bookplate page and a strip of paper cut from the Dear John page. I used paper and organza flowers, as well as white tulle, two different types of May Arts Pink Ribbon and Heart Ribbon Buckle and Smooch pearlized accent ink in Shabby Pink. I added a Prima Resin Cherub and a small round doily.
2. Cut a two-inch strip of paper into 3/4-inch wide strips and cut a V in one end of each strip to create the banner pieces.
3. Distress the edges of all the banner pieces, the tag and the doily. I used a craft-knife and edge-distresser for the tag/banner pieces and simply scrunched the doily.
4. Start assembling the tag. I started by placing the doily on the tag and then layered the banner pieces on top of each other, off-setting and raising each row above the previous one.
5. Start embellishing! I rolled each of the banner elements upwards to add some more dimension to the tag. I added the cherub as the focal point for the tag and the paper/organza flowers framing the cherub. I painted the inner petals of the paper flowers with the Smooch pearlized ink (unfortunately this doesn't show up all that well in the photo - but looks really pretty in real life). I also added in a couple of small 'corkscrews' I made from the stems that I cut off the paper flowers.
6. Add the tulle and ribbon. I cut the tulle so that the ends each had a nice V shape to mirror the V of the banner elements. I punched a hole at the top of the tag and looped the tulle through it. I threaded the two different pink ribbons through the ribbon buckle and then glued that over the hole where the tulle was attached to the tag.
That's it - the completed tag! Here is a close-up of the finished tag taken from a slight angle so you can see the dimension and embellishments a bit better.
I hope you enjoyed my little Build-a-Tag tutorial. Stop by my blog and leave me a comment if you decide to try this for yourself - I'd love to see what you do!
Materials Used:
Patterned Paper - Prima Romance Novel Collection - Dear John, and Bookplate; Prima - Ingvild Bolme - Resin Embellishments - Cherub; May Arts Curly Ribbon - Pink; May Arts Grosgrain Ribbon - Pink; May Arts ½” Heart Ribbon Buckle; IAR, Organza Beehive Blossom Flower, Pink; IAR, Babies Breath Flowers, Pink; Small White Doily (stash); White Tulle, Aleene's Tacky Glue, Glue Dots - Craft and Mini; Memory Tape Runner XL.


Awesome!
ReplyDeleteI'm so glad you shared your technique with us. This is gorgeous!
ReplyDelete