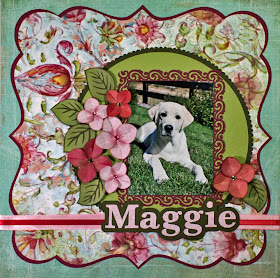
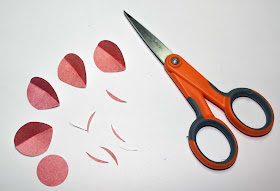
 The hydrangeas are made with circles. I used three circle punches to create the two different size flowers. My punches are 1 half inch, three quarters of an inch and 1 inch in diameter.
 You will need five circles for each flower, four circles of the same size make the petals. One circle 1 quarter of an inch smaller is the base which you will use to glue your petals.
On my layout the large flower is made with four 1 inch circles for the petals and 1 three quarter inch circle for the base. The small flower is 4 three quarter inch circles for the petals and one half inch circle for the base.
 I recommend that you try lightweight paper for your flowers. We are going to fold and glue each petal and the lighter weight paper is easier to handle. To get started, after you have punched your circles fold each petal in half.
 Now we are going to create second fold. In the picture I have drawn a line to indicate where this second fold will be.
 Once you have your second fold your petal should look something like this. Now carefully unfold the petal.
 Now place glue in the folds you just made and then fold the petal again. Hold the petal a short time to give the glue a chance to dry.
 Do these same steps for the other three petals. Your petals should have a slight curve to them now which gives them a more realistic petal shape.
Our petals are still too round to be just right, so now we will do just a little trimming.
 I have turned one of my petals over and drawn lines on the back of it to give you an idea of how we will trim them. We just want to take a little bit of the roundness out of the bottom of the petal near our fold. Cut just a little away to create a slight point near the fold. Try to stay on the lower half of the petal, we want the top half to stay round. In my picture I put a couple of small horizontal lines to mark the half way point. You won't cut these lines, they just give you a visual point for half way up the petal.
 Above is a picture of my trimmed petals, you can see I just took a little bit of the paper away.
 I chose at this point to distress my petals. I used a Walnut distress ink on my darker flowers and Victorian Velvet on my light pink flowers. This is, of course, optional. You might decide to do something like Glimmer Mist or chalk to enhance your petals.
The darkened edges give the petals more definition and helps them stand out on the finished flower.

Now it is time to assemble our flower. Using the small circle as a base, glue two petals to the circle lining the points of the petals up in the center of your base. Now glue your remaining two petals on top of the first two spacing them evenly between the first petals. Line your points up in the center.

Add some rhinestones, pearls or other pretty centers to your flowers and they are ready for your layout!
Hope you have fun with these! I will probably use them often on my pages, cards and gift boxes.


Hi Pam!! These flowers are amazing!! Beautiful beautiful!! Thanks for this tutorial!! I loved it!! :) And the LO is amazing too!!
ReplyDeleteI love hydrangeas. Thanks for sharing.
ReplyDeleteOh wow Dolores!! These are totally fabulous! Thank you so much for sharing such a cool tutorial!
ReplyDeleteGreat idea!
ReplyDeletehow lovely! thanks for sharing!
ReplyDelete