
Step 1: Open you photo in Adobe Photoshop Elements.
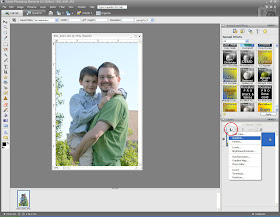
Step 2: Click on the Create and Adjustment Layer button right above the layers palette on the bottom right side. Go down the Gradient. You will see this new layer pop up in the layers palette. A box will also pop up. The setting should be Linear, angle 90, and scale 100%. Also, make sure that Reverse and Align With Layer are clicked. Now click on the image next to the Gradient (it says "click to edit gradient") . A new box will pop up.
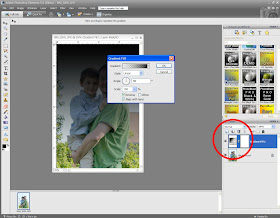
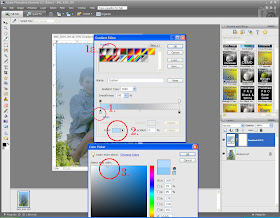
Step 3: First make sure the right preset gradient is in place - foreground to transparent (see 1a). Next, go to the bottom left black arrow like the one I have circled (see 1). Click on the color bar next to the word color (see 2). Another box will pop up. Go to the correct color you want. I chose a sky blue (see 3). Click OK.
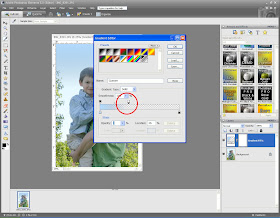
Step 4: Go up to the top white arrow like the one I have circled. Slide that over the left until you have the right amount of blue on your photo. This is the opacity stop. It basically tell it when to fade the color. Now click OK on all of the boxes.
Step 5: To get rid of the color on the people follow these steps. Click back over onto to photo layer on the layers palette (see 1). Click in the magic wand tool on the left side tool bar (see 2). Go to white in the sky and click on that. Marching ants will light up everything (see 3).
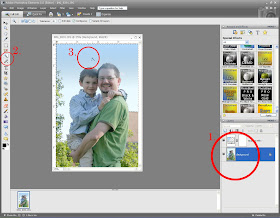
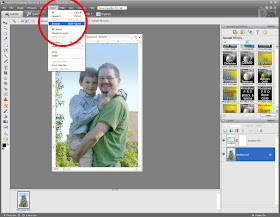
Step 6: On the top tool bar, go to Select >Inverse.

Step 7: Click back onto the gradient layer in the layers palette (see 1). On the top tool bar, go to Layer > Simplify Layer.
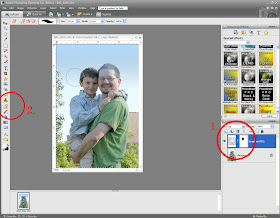
Step 8: Your gradient layer should still be highligted (see 1). Go to the eraser tool on the left side tool bar (see 2). Now go over you photo and erase. This will erase the blue from the subjects of the photo! To get the marching ants to stop go to the top tool bar to Select > Deselect.
Step 9: This step is optional. If you want to make the blue skies just a little lighter, you can go to the layers palette and go to opacity. Move the bar to the left until it how you like it.
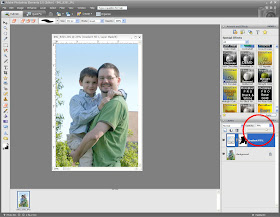
Step 10: Flatten your image and you are all done (on the top tool bar go to Layer > Flatten Image) . Save your image under a new name.


You are so talented with the Adobe Photoshop Elements. I am going to have to look into getting this program for my computer.
ReplyDeleteI definitely need to try this.
ReplyDeleteSo very cool Pammy! Thanks for sharing!
ReplyDelete